

Aerochrome II shooting guide
This guide is best viewed on desktop for the full experience
Written by: Kenneth Keeler
Introduction
My goal with this guide was pretty simple, to help people get the best results possible from Aerochrome. This film is rare and expensive. For a lot of folks, they’re only ever going to shoot one roll, maybe two. I wanted to make something that helps people get the most out of it, so they have a fun, easy experience of this one of a kind film stock. I’m not an expert, and I don’t pretend to be. I’ve just tested this film a lot, made a bunch of mistakes, and spent way too many hours reading everything I could find online about it. This guide is a mix of that research and my own hands-on experience.
I want to shout out photographers like Richard Mosse, Karl Ferris, and Elliott Landy who helped bring Aerochrome into the spotlight of our niche film world. Their work pushed the creative potential of this film and inspired me, and a lot of others to start experimenting. This guide is my attempt to pass that experience forward, to make shooting Aerochrome less intimidating and more accessible for anyone who's curious. Although there’s a lot of detail and some words of caution in this guide, it’s a fun ride and not something to stress about! There are a lot of ways to shoot and develop this film depending on the look you’re going for, and honestly, there’s no wrong answer, unless you open up the back of your camera mid roll. Don’t let the details overwhelm you.This guide is just what I found gave me the best results!
Read the guide, know the differences between the options and go with your gut! Most importantly, have fun. It's just film. It’s meant to be shot. Successes and failures are all part of the journey.
What is Aerochrome?
Aerochrome is a legendary infrared color film that produces stunning false-color images, turning foliage into vibrant reds and pinks while rendering skies and water in deep blues. Originally developed for military and aerial reconnaissance, Aerochrome has found new life in artistic and experimental photography. This guide provides detailed information on Aerochrome's history, specifications, exposure recommendations, filter usage, processing techniques, and best practices for achieving the most striking results.
Film Overview & Specifications
Name: Kodak Aerochrome II 2443 Estar Base
Type: False-color infrared film
Base: Estar (polyester)
Format: 35mm
Sensitivity: Approximately 520–900nm (green to near-infrared spectrum)
ISO Rating: Nominally ISO 400; adjustments may be necessary based on exposure, and development process (see below)
Contrast: Lower contrast compared to earlier versions like 8443, allowing for better detail in shadow areas
Grain: Fine grain with excellent sharpness
Processing: Designed for E-6 reversal processing; can also be cross-processed in C-41 for negatives
Brief History of Aerochrome
Kodak developed Aerochrome during World War II for military applications, particularly for camouflage detection. The film’s infrared sensitivity allowed for distinguishing between natural foliage and artificial materials. Over the years, Aerochrome found applications in forestry, agriculture, and medical imaging. Notably, artists like Karl Ferris, Elliott Landy, and Richard Mosse utilized Aerochrome for its unique aesthetic qualities. The final iteration, Kodak Aerochrome III 1443, was discontinued in 2009.
Types of Aerochrome Over its lifetime, Kodak produced multiple versions of Aerochrome with variations in film base, processing requirements, and spectral sensitivity:
Kodak EIR (Ektachrome Infrared): A 35mm film popular for artistic applications.
Kodak Aerochrome III 1443: The final iteration before discontinuation, widely used in scientific and surveillance applications.
Kodak Aerochrome II 2443: A rare Estar-based version known for its archival quality and enhanced infrared sensitivity. This version was an update designed for E-6 processing. This is the version we are selling.
Kodak 2427: A black-and-white infrared film developed for aerial photography and reconnaissance.
Step 1: Choose your development option
Before shooting Aerochrome, you need to decide whether you'll develop it in E6 or C-41. This choice affects how you'll rate the film (ISO) and how the colors will render. Below I have listed the difference I have found between the two options. Give them a read and then check out the photos for examples
E6 Development (Slide Film)
Produces positive transparencies with vivid reds and cooler magentas
The "classic" Aerochrome look
Tends to show a blue cast in the shadows, especially with Yellow #12 filters, darker the filter Yellow 15 Orange 16 Less of a blue cast
Limited dynamic range due to the reversal format
Less flexible in post-processing, colors are essentially baked into the film
Ideal for those who want pure, untouched slide results
Easier access to development, most pro labs still offer E6, but always call ahead to confirm they can process color infrared film
Clearly label your roll as COLOR INFRARED – E6 to avoid lab errors
C-41 Cross-Processed Development (Negative Film)
Produces a negative, giving you little bit more dynamic range and greater scanning flexibility
Slightly warmer tones and typically less of a blue cast (depends on filter)
Easier to edit in Lightroom/Photoshop, more control over white balance and tone curves
Cross-processing introduces some very subtle color shifts, different from the original E6 look
More forgiving with expired or fogged film
IMPORTANT : Most labs run C-41 in automated machines with infrared sensors that can damage Aerochrome. CHECK WITH YOUR LAB FIRST Always call ahead and ask if they can hand-process it, otherwise we highly recommend developing your roll at home.
We typically use C-41 for more control in post. All our C-41 test rolls were developed at home, just like any other color film. Its easy we will get to that part later in the guide!
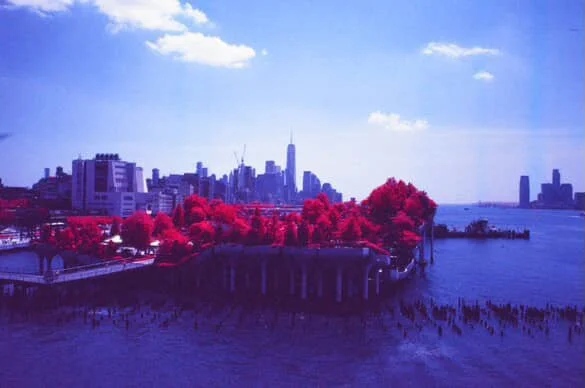
Photographed by: Stacy Dimapelis Instagram @stacydimapelis
Image was Developed E-6 shot at 200 ISO with Yellow #12 Filter
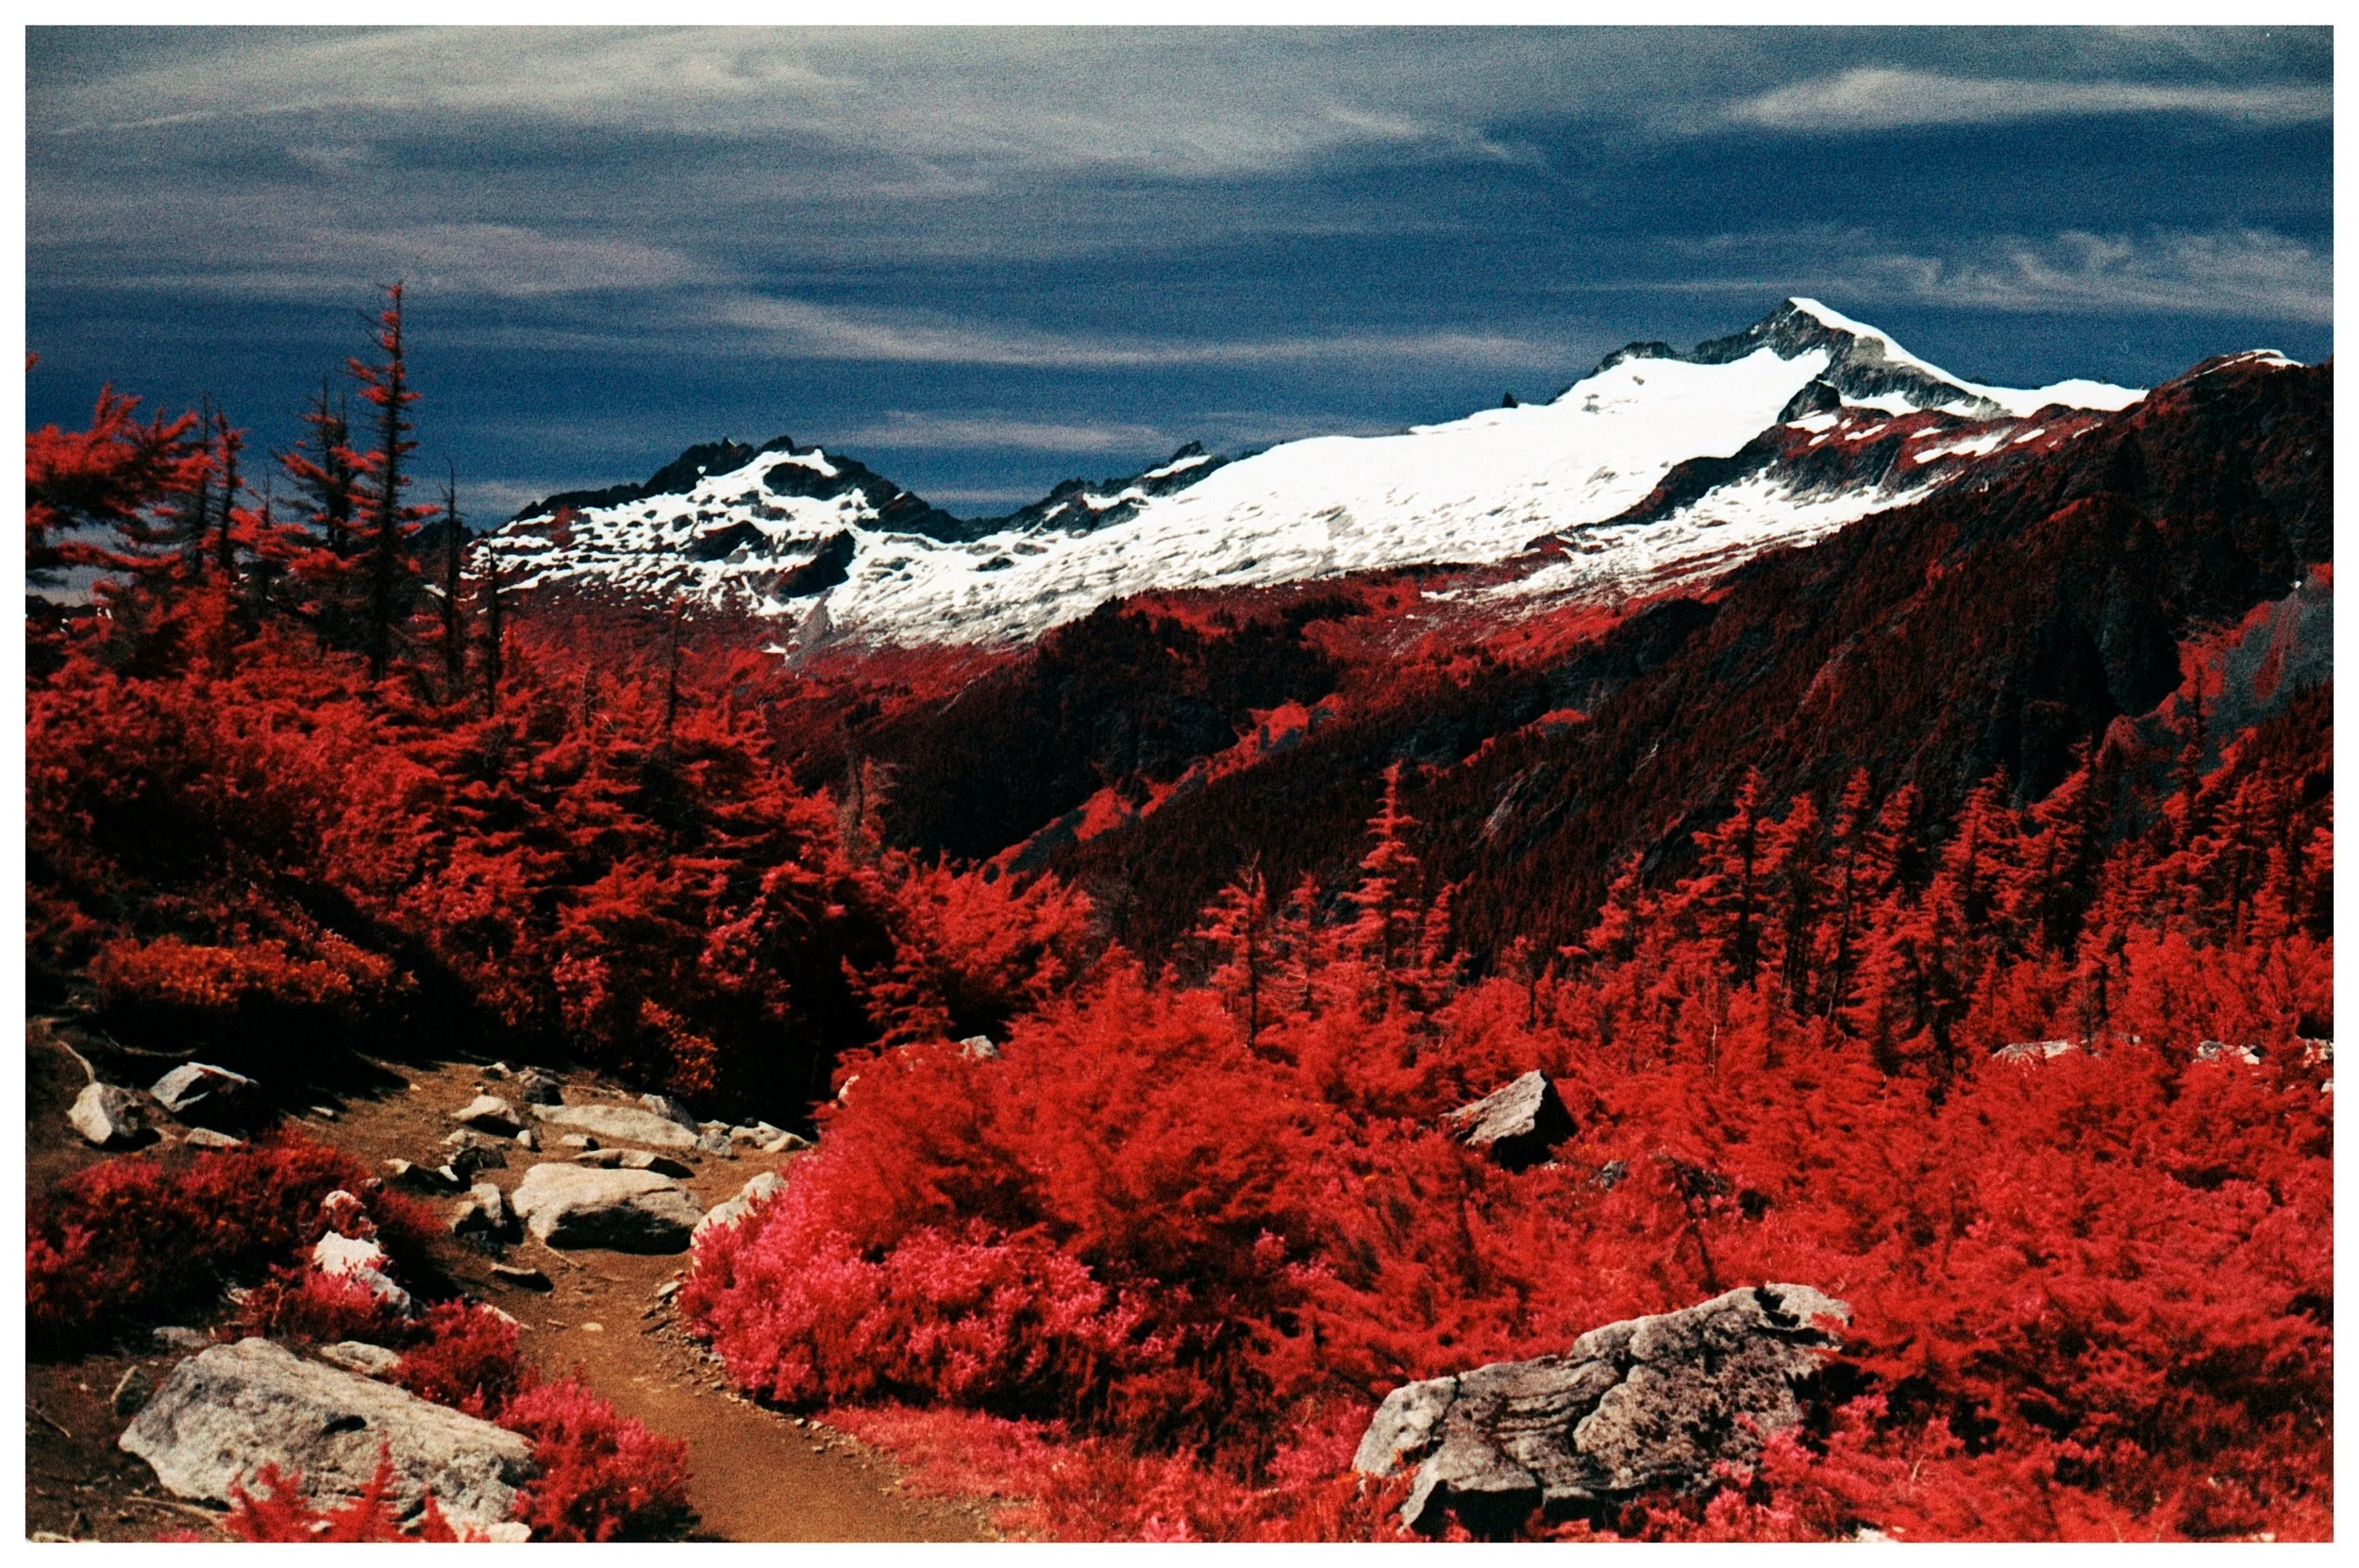
Photographed by: Niko Feldman Instagram @nikofeldman
Image was Developed C-41 shot at 200 ISO with Orange #16 & Circular Pola filters
Step 2: Choosing your Filter
Aerochrome must be shot with a filter to give you the infrared look. I have included a list of filters below and the different results you can expect with each one to help you make your decision. The filter helps block blue light, which all three layers of the emulsion are inherently sensitive to. The filter you choose will dramatically affect the final look and the way Aerochrome responds to infrared light.
Yellow #12 : Often considered standard, and the box speed ISO 400 assumes this filter. In E6, it may produce a noticeable blue cast.
Yellow #15: Slightly deeper yellow. Helps reduce the blue cast especially in E6. Many prefer this for a more pleasing color balance.
Orange #16: Boosts reds, stronger contrast. This is my favorite filter to shoot aerochrome with!
Red #25 or R72 (Infrared): Generally not recommended unless you’re experimenting. These block too much visible light and can result in muddy or minimal results. I have never tested these with aerochrome myself but in our Additional resources at the bottom of the guide you can see some examples in Richards article.
Circular Polarizer (Stacked with a Yellow or Orange): One of my personal favorite combos. Adding a polarizer in addition to your color filter of choice. The polarizing filter helps reduce reflections on foliage, boosts contrast, and can dramatically darken the sky. Depending on the scene and angle of light, skies can shift from deep blue to almost black for a bold, dramatic look. My favorite Combo is Orange 16 with a Circular Polarizer

Filter Yellow #15 Developed in C-41

Filter Yellow #15 Developed in C-41

Filter Yellow #15 Developed in C-41

Filter Yellow #15 Developed in C-41

Filter Yellow #15 Developed in C-41

Filter Yellow #15 Developed in C-41

Filter Yellow #15 Developed in C-41

Filter Orange #16 + Pola Developed in C-41

Filter Orange #16 + Pola Developed in C-41

Filter Orange #16 + Pola Developed in C-41

Filter Orange #16 + Pola Developed in C-41

Filter Orange #16 + Pola Developed in C-41

Filter Orange #16 + Pola Developed in C-41

Filter Yellow #12 Developed in E6

Filter Yellow #12 Developed in E6
Step 3: Exposing & Metering
Exposing and Metering Aerochrome can seem tricky! There are many factors that come into play and each guide gives a little different info which can make it seem scary and confusing. Rest assured! It's not hard! I'm going to lay it out for you as simply and straight forward as possible based on my personal experience and what worked for me. Most of the cameras I have used testing Aerochrome have a Through The Lens (TTL) metering system. Basically just a camera that takes a light meter reading through your lens, so if you have a filter on it will compensate for whatever filter you are using.
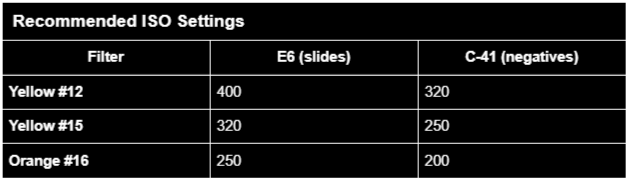
Some quick technical information. Aerochrome II (the version we sold) has a base ISO of 400, but think of that only as a starting guideline. Your actual results will depend on many variables, the film’s age, how it’s processed E6 or C-41, the light and weather when you shoot, even the season and where in the world you are.The nominal ISO rating of 400 already accounts for the use of a yellow #12 filter, i.e. in theory you do not need to compensate for the Yellow #12 filter. Alot of guides mention this and this is correct, But I found that putting whatever filter I wanted to shoot with on my lens and setting my camera's ISO below depending on my Development choice worked great and produced awesome results!
Now back to the easy stuff. Basically you know which development process you want to do (E6 or C-41), You pick what filter you want to try and Just set your ISO to one of the options in the chart below based on those two choices. Yes the meter is going to compensate for the filter, but I found the film liked getting more light and the results to me looked great. So I felt there was no need to over complicate it. Yes other guides say different things, no they're not wrong, but this process works as well!
If you have to use a hand held spot meter no worries, you can hold the filter up and still meter through the filter the same way. Just make sure to set your meters ISO based on whatever development process you choose and filter you are using.
Note: If you want to add a Polarizing filter with any of the filters above. Use the iso for the filter above that you choose and then if metering through the camera lens (TTL) it will compensate for the Polarizer. If you are using a handheld meter, hold both your color filter and your pola filter over it and take a meter reading.
Metering Tips:
There are many guides that recommend pointing the center of your camera's TTL meter (usually the circle in the middle but all depends on the camera) or your handheld spot meter at the brightest foliage in the frame. This is good practice but I also just shot normal. Meaning I framed up the composition how I wanted it, looked inside the camera's viewfinder to see what setting it was telling me to shoot, set that setting and shot the image. Play around, both work. The reason some suggest metering the brightest foliage in the frame is because infrared light reacts differently and sometimes can seem overexposed. I tested this approach and sometimes got great results and some images I felt other parts of the frame were too dark. So alot of the time I just frame up what I want the image to be and set the camera to what my meter says. You can also meet in the middle. Point your meter at the brightest foliage in the frame, and then point it at a darker area and set the setting to meet in the middle.
Notes: If in doubt, bracket your exposure, Shoot one shot as reccomended above, shoot the next shot and overexpose ⅓ or ½ of a stop. Aerochrome prefers extra light especially when developing C-41, if your camera has an exposure compensation dial ( The dial with +1 +2 0 -1 -2) you can set it to +½ stop or whatever you want.
Recommended Processing Lab
We highly recommend TheDarkroom.com E6 processing. They understand infrared film and do not charge extra fees for this special film. If you want them do develop your film in C-41 call or e-mail them first.
Developing Aerochrome in C-41 at home.
If you know how to develop normal color film at home in C-41 chemicals, developing your roll of Aerochrome is not different! It's easy! Surprising I know. All you need to do is take your film into a dark bag, inside the dark bag load your aerochrome roll into your developing tank, seal it and follow the development times and instructions for whatever C-41 chemicals you normally use. For all our C-41 tests I used the Unicolor 1L C-41 powder kit. With a paterson tank
The steps we followed in the image (to the right) from Unicolors instructions:
Notes: Learn from my mistakes. Only use developing tanks with black tops. I used one old tank that had a red top and I got fogging one roll. IR color film is much more sensitive and although most developing tanks are supposed to be light tight I recommend closing your blinds if you can and using only tanks with a black top for safety.

Common Mistakes to Avoid
Avoiding these will save you a ton of heartbreak (and wasted film).
Loading the film in broad daylight: Load and unload the film in subdued light or in a dark room like a bathroom with the lights off
Shooting Without a Filter: Will look washed out and muddy.
Not Covering your film viewing window: If your camera has a little window on the back door to see what film you have loaded. Cover it from the outside with Black gaff tape or Black paper tape to avoid light leaks! On normal film this window isn't a problem on Aerochrome it can ruin your film. Black it out!
Wrong ISO Setting: Especially if changing filters. Double-check your camera setting and or light meter setting if you change filters mid roll.
Underexposing in E6: Blown highlights and unusable shadows.
Overexposing too far in C-41: Can flatten colors and make reds oversaturated.
Fogging the Film: Load and unload the film in subdued light or in a dark room like a bathroom with the lights off. Even a night light can ruin it.
Storing in Heat: IR-sensitive film is easily damaged. Keep refrigerated.
Letting Labs Guess: Clearly mark rolls “COLOR INFRARED E6” or “COLOR INFRARED C-41 HAND DEVELOP” to avoid mistakes. Also if you are developing C-41 but not doing it at home you need to call your lab ahead of time and ask them if they can hand process the roll. Normal C-41 use infrared sensors that can ruin Infrared color films. Make sure your lab can do this. That is why we recommend processing C41 at home for safety.
I made this video talking through all my Aerochrome tests, what worked, what didn’t, and the mistakes I made along the way. If you want a deeper look into my testing process , give it a watch. And don’t forget to hit subscribe so you don’t miss out on all the other awesome series we have.

Example of Light Piping on the negative.

Light Piping example, notices the fogging on the edges.

Light Piping example, notices the fogging on the edges.
FAQ & Troubleshooting
Q: Can I shoot Aerochrome without a filter?
Technically yes, but it defeats the purpose, you’ll lose the false-color IR effect.
Q: Can I get my Aerochrome developed at a lab in an automatic C-41 machine?
We don’t recommend it. Most automatic C-41 minilabs (like Noritsu or Frontier) use infrared sensors to track film position, and since Aerochrome is infrared-sensitive, those sensors can fog or streak the emulsion. On top of that, the roller transport systems in these machines aren’t always gentle on specialty film stocks. The safest options are to develop Aerochrome at home with a C-41 kit or call your lab and ask how they process film. If their machine uses IR sensors or they’re not sure, ask if they can hand-develop your roll , otherwise, it’s best not to risk it.
Q: My scans are blue. What happened?
That’s common with E6 and depending on what filter you used. Try color-correcting in lightroom. Play around using the temp and tint sliders in lightroom or if you are advanced with editing try by lowering blue shadows and boosting red mids.
Q: What’s the difference between E6 and C-41 results?
E6 is higher contrast with a blue cast. C-41 has more flexibility, softer reds, and easier edits. Each requires a different ISO when shooting. We like C-41 because it's easy to develop at home and you have more room to edit the colors in lightroom
Q: Can I use Aerochrome in a point-and-shoot?
Only if it allows filter use and manual ISO settings. Otherwise, not recommended.
Q: Can I push or pull Aerochrome?
Not recommended. We have never tested this and with that said the results are unpredictable, and color Infrared film doesn’t react like regular film.
We will update this FAQ as we get more questions or think of other important point to add.
Examples of E-6 Negatives
Additional Resources
By adhering to these guidelines and understanding the unique characteristics of Aerochrome, photographers can achieve striking and surreal images that showcase the film’s distinctive aesthetic. With limited stock available, this film is a true collector’s item—use it wisely and enjoy its stunning, surreal beauty.
For further questions, don’t hesitate to contact us at info@tccfilm.com.